
Using the paper eco printing kit
Our paper eco printing kit is based on metal plates. It was designed to fit 5 x 7 inch greeting cards or folded paper. We chose this size because it fits easily into a medium pot, so you don't have to buy and store a giant cooking pot (although once you get hooked on this craft you will probably end up buying a giant cooking pot!)
If you've never seen paper eco printing before it would be hard to get your head around it. What do you do with it? How does it work? Check out this video for a quick overview.
Here are some of the lovely cards and paper items that I've made with the kit. My style is quite abstract. You can also do designs with clear, distinct leaf or flower prints.

This paper printing kit is designed to be used with a spirit of fun and experimentation. I know you'll be asking ‘but what exactly do I do?’ and the answer is ‘almost anything’ (but not with poisonous plants!)
Australia is blessed to have an abundance of Eucalyptus (Gum) trees, a plant whose leaves are prized all over the world for their magical eco-printing qualities. But it’s not just Gum leaves that can be used to create magical prints. One of the reasons paper printing is such fun is that you can get a result from almost any botanical ingredient. Some impart their colour to the paper. Others block colour and create pale shadows (this is known as a 'resist').
Here I describe two very different paper printing projects that give you an idea of two basic techniques to start off with. One involves lightly steaming your paper stack over simmering water, and for the other project you will submerge the paper in a dark coloured dye made of kitchen scraps with or without added botanical dyes. These are just two of the many projects you could try.
You will need a medium to large pot dedicated to eco printing (not used for food preparation). Tongs would be handy. Oh...and you will be making a mess.
Clean and pretty (Using the kit to create flower prints)
This paper Eco Lantern is made by dipping photocopy paper (80GSM thickness) in a dye made of Sappanwood. You could also use onion dye, avocado, turmeric black tea and many more botanical dyes. Then steam a pressed dye flower (in this example it is Cosmos) with the paper between metal plates for 15 minutes.

Examples of other botanicals that can be used are Coreopsis, Marigolds, Mexican marigolds, Cosmos, Nasturtium, Geranium, Hibiscus, Onion skins, Roses... However you can't use just any old flower in a project such as this. The result may be disappointing because most flowers produce very little dye.
The paper should be treated with a mordant (in this case it is alum). A starter pack of alum comes included in our kit.
To create multiple layers of cards, dissolve 1 heaped teaspoon of alum in hot tap water. Put your alum solution in a container large enough to hold a sheet of paper card (for example a plastic storage container) Wearing gloves, dip each piece of card you are using into the solution and submerge it. You don’t need to soak it for long. Take out the card and place it on rags or paper towel.
Create your ecoprint ‘sandwich’
Place one of the aluminium plates on your work surface. Put a piece of calico cloth on top (this helps keep the paper clean and stops it sticking to the plate) Put down a piece of paper card. Next arrange some botanicals on top, followed by another piece of card followed by another piece of calico...
Followed by another piece of card, followed by more botanicals... keep going. Finish with an aluminium plate. Clip it together with the 4 foldback clips Place it in a pot on a steamer rack and steam for 15 -30 minutes depending on the thickness of the cardvbundle. (DO NOT SUBMERGE). Unbundle and wash the card gently in plain water.
This is a basic technique for cardstock. When using thin paper there are a few tricks to prevent the paper tearing and sticking together. I'll cover these in a later blog post.
Optional extras
Your kit also contains French Terry cloth, a steel plate, iron sulphate powder and a copper plate. You can soak the French Terry in a small bowl of water with 1/2 teaspoon of iron sulphate added. Insert this cloth somewhere in your bundle. The iron will make the flowers quite dark, so use with caution. You could also soak the cloth in a dye solution. Similarly, the copper and iron plates can be added to the bundle. I’m not going to tell you exactly where to put them - that’s part of the fun. If you don’t like the result, keep it and print over it again.
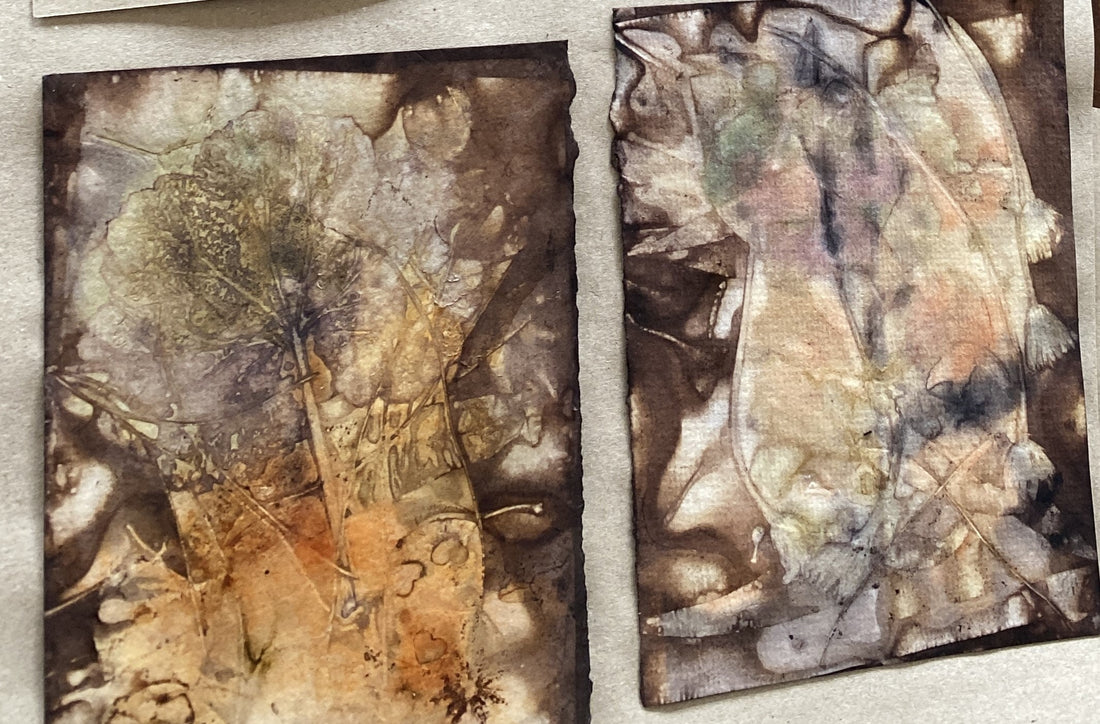
Down and dirty
This project produces a very different result compared to ‘clean and pretty’. For this you need to make a ‘dirty pot’ to submerge your paper ‘sandwich’ in. An alternative to the dirty pot is to use onion peels to create a dark brown ‘onion peel soup’, or add a botanical dye. Simmer for 30 minutes minimum. A dirty pot could contain any of the following ingredients: Kitchen scraps such as tea and coffee grinds, avocado, onion skins, leftover botanical dyes, tannin rich leaves such as eucalyptus, geranium, sheoak and liquid amber. Rusty metal items such as an old steel can. Half a teaspoon of Iron sulphate powder.
Botanicals that are suitable for this project include: Eucalyptus leaves, silky oak, sheoak. gum nuts, geranium leaves. Various weeds and herbs. Kitchen items such as onion skins. A wide variety of flowers, reeds and grasses. Rose leaves and petals
The sequence of layering is slightly different here as the project works best with botanicals between every layer of paper or card. This will create paper prints with a design on both sides, leaving you with the difficult task of choosing the best one to display. When applying the botanicals, let them hang over the sides - this helps to draw the dye from the ‘dirty pot’ into the bundle.
Prepare your paper
Use the same technique to prepare the paper as outlined in the ‘clean and pretty’ project. Be aware that alum tends to make the composition quite yellow. You could also try soaking some or all of the paper with rusty water. (prepared with half a teaspoon of iron sulphate powder or by soaking rusty metal in vinegar).
Create your ecoprint ‘sandwich’
Place one of the aluminium plates on your work surface (no need to use calico) Put down a piece of paper card. Next arrange some botanicals on top, followed by another piece of card, followed by more botanicals.... keep going and if you wish- incorporate the copper and steel plates and iron soaked Terry too. Finish with an aluminium plate. Clip it together with the 4 foldback clips. Place it in your ‘dirty pot’ and submerge. Simmer for 90 minutes minimum.
Seasoning your plates
As time goes by you want your steel and copper plates to rust so that they work better. You can help this along by coating them with vinegar and salt, and leaving them outside in the garden!


